![]() This Midnight Mining guide covers everything you need to level from 1 to 100 and farm ore efficiently. You'll find the best farming routes for every zone, skill ranges, how infused deposits and overloading work, which profession equipment and consumables to use, and how Deftness, Finesse, and Perception affect your gathering.
This Midnight Mining guide covers everything you need to level from 1 to 100 and farm ore efficiently. You'll find the best farming routes for every zone, skill ranges, how infused deposits and overloading work, which profession equipment and consumables to use, and how Deftness, Finesse, and Perception affect your gathering.
What Changed in Midnight
If you mined ore in The War Within, here's what's different in Midnight.
- Two Qualities Only - Ore now only has two quality levels (Silver and Gold) instead of three. Bronze quality is gone entirely.
- Artisan Miner's Moxie - The shared
 Artisan's Acuity currency from The War Within has been replaced by a profession-specific currency,
  Artisan Miner's Moxie. You can now only spend it on Mining-related items.
 - Epic Profession Gear - New Epic-quality gathering gear is available with more secondary stats than Rare gear, but they give the same skill bonus.
Specializations & Knowledge Points
This guide only focuses on leveling and farming. I made a separate guide that covers all Knowledge Point sources, treasure locations with maps, and specialization builds:
Specialization Builds & Knowledge Guide
Mining Trainer
You can learn Midnight Mining from Belil in Silvermoon City.

Profession Equipment
Mining profession equipment now includes an Epic tier. There's no primary skill difference between Blue and Epic pieces. The only difference is the secondary stat amount.
You have three equipment slots: Hardhat, Satchel, and Pickaxe. The Hardhat and Satchel are accessories from Engineering, and the Pickaxe is a tool from Blacksmithing.
| Tool/Accessory | Crafted By | Materials Needed |
|---|---|---|
| Engineering | 1x |
|
| Engineering | 1x |
|
| Blacksmithing | 6x |
|
| Engineering | 2x |
|
| Engineering | 2x |
|
| Blacksmithing | 5x |
|
| Engineering | 2x |
|
| Engineering | 2x |
|
| Blacksmithing | 5x |
Customizing Profession Tool stats
Accessory stats are fixed, so just get the highest quality you can. Profession tool stats can be customized with missives. For green gear, it's usually best to just buy one with the correct stats. Blue items are now BoE, so check the Auction House for the right stats, or place a Crafting Order with the appropriate missive if you can't find what you want. Epic items are still soulbound, so a Crafting Order is required. Don't forget to enchant your Tool too.
| Stat | Missive | Enchant |
|---|---|---|
| Deftness | ||
| Finesse | ||
| Perception |
Finesse, Deftness or Perception for Mining?
Deftness increases gathering speed, Finesse gives you a chance to yield extra materials from each node, and Perception gives you a chance to find extra ![]() Dazzling Thorium when it drops. It doesn't increase the base drop chance, just the bonus amount when one does drop.
Dazzling Thorium when it drops. It doesn't increase the base drop chance, just the bonus amount when one does drop.
For tools, get one with Deftness or Finesse. I don't think Perception is worth it unless Dazzling Thorium is selling for crazy prices.
In some Midnight zones it's really hard to avoid mobs while mining, so I'd recommend getting enough Deftness to mine without fighting.
With the consumables listed below you can hit a comfortable Deftness level and just stack Finesse after that. If mobs are still interrupting you, get a Deftness tool with Deftness enchant too.
Consumables
Using ![]() Azeroot Tea and
Azeroot Tea and ![]() Darkmoon Firewater makes mining feel much smoother. I'd say they're mandatory for effective farming since mining nodes take a while to channel.
Darkmoon Firewater makes mining feel much smoother. I'd say they're mandatory for effective farming since mining nodes take a while to channel.
| Consumable | Effect | Duration |
|---|---|---|
| +38 Perception (+3.8%), +11 Deftness (+3.6%) | 30min | |
| +38 Finesse (+3.8%), +11 Deftness (+3.6%) | 30min | |
| +50 Finesse (+5.0%) | 1 hour | |
| +50 Perception (+5.0%) | 1 hour | |
| +50 Deftness (+16.6%) | 1 hour | |
| +15% Deftness | 1 hour | |
| +43 Finesse (+4.3%) for gathering tools | 2 hours |
Infused Deposits & Overloading
While mining, you'll come across infused versions of regular ore deposits. They have a glowing visual effect and drop extra materials (motes), but they also hit you with a negative effect when you mine them.
How to get the Overloading spell
Once you mine an Infused Deposit for the first time, you learn the Overload ability. You can use it near an infused deposit to trigger a bonus effect. The cooldown is 12 hours, but it's reduced by 30 minutes every time you mine a Midnight ore deposit. That means roughly 24 deposits to fully reset the cooldown.
This usually gets added to your action bar automatically, but if you don't see it, you can find it in your spellbook under the General tab. It's not in the profession spellbook. It's in the normal one.
List of infused deposits by zone
Each infused type is concentrated in one zone, though you'll find a few scattered elsewhere. There are a few Lightfused in certain parts of Harandar, and a few Voidbound in Eversong Woods and Zul'Aman, but the vast majority are in the zones listed below.
| Deposit Type | Zone | Mote |
|---|---|---|
| Lightfused | Eversong Woods | |
| Wild | Zul'Aman | |
| Primal | Harandar | |
| Voidbound | Voidstorm |
Overloading
Using Overload on an infused deposit gives you a bonus effect depending on the type.
| Deposit Type | Normal Gather | Overload |
|---|---|---|
| Lightfused | Light circles appear on the ground. Stand in them to get extra motes. | Even more light circles spawn on the ground. It's pretty hard to catch all of them, so you'll probably miss a few. |
| Wild | Ore creatures (Rumbling Orelings) spawn. Kill them and mine their corpses for extra motes. | An elite creature spawns. Killing it gives you a 150 Perception buff for 5 minutes. No extra motes. |
| Primal | Nothing extra. You get a minor slow and DoT. | You channel 50% of your HP to get extra motes. Don't interrupt the channel! It seems that mobs won't interrupt you, but the HP drain can actually kill you, so make sure you're above 50%. |
| Voidbound | Nothing extra. A void zone pulls you in, but nothing really happens. Just walk out. | A portal appears along with purple orbs. Run into the orbs quickly or they disappear. You get motes and ores for each one. The portal just teleports you to random places. It's just not worth using in its current form. |
Mining Farming Routes
I'd recommend starting in Eversong Woods since it has the most straightforward terrain and lower mob density. Once you're comfortable, move to the other zones for variety and to trigger first-gather Knowledge bonuses from new deposit types.
Don't follow these routes strictly, just use them as a general guideline and feel free to explore the zones. The routes are designed to hit the main deposit nodes in each zone, but there are also deposits that spawn outside of the routes, so it's good to explore and find your own paths too.
Skill Ranges
Normal deposits give skill points early on, but they stop being useful around the halfway mark. After that, you need Rich deposits, Seams, or Infused deposits to keep gaining skill.
- 1 - 30
Pretty much everything gives skill points. You'll reach 30 fast just by mining whatever you find.
- 30 - 60
Base deposits go yellow at 30 and grey at 60. Rich deposits, Seams, and Infused variants also give skill here.
- 60 - 100
All base deposits are grey. Only Rich deposits, Seams, and Infused variants give skill now (yellow at 60, grey at 100). They spawn randomly in place of normal deposits, so just keep mining and you'll find them.
One of the easiest to follow routes, it's basically a loop around the whole zone, with a short detour through the middle on each side to catch the nodes there.
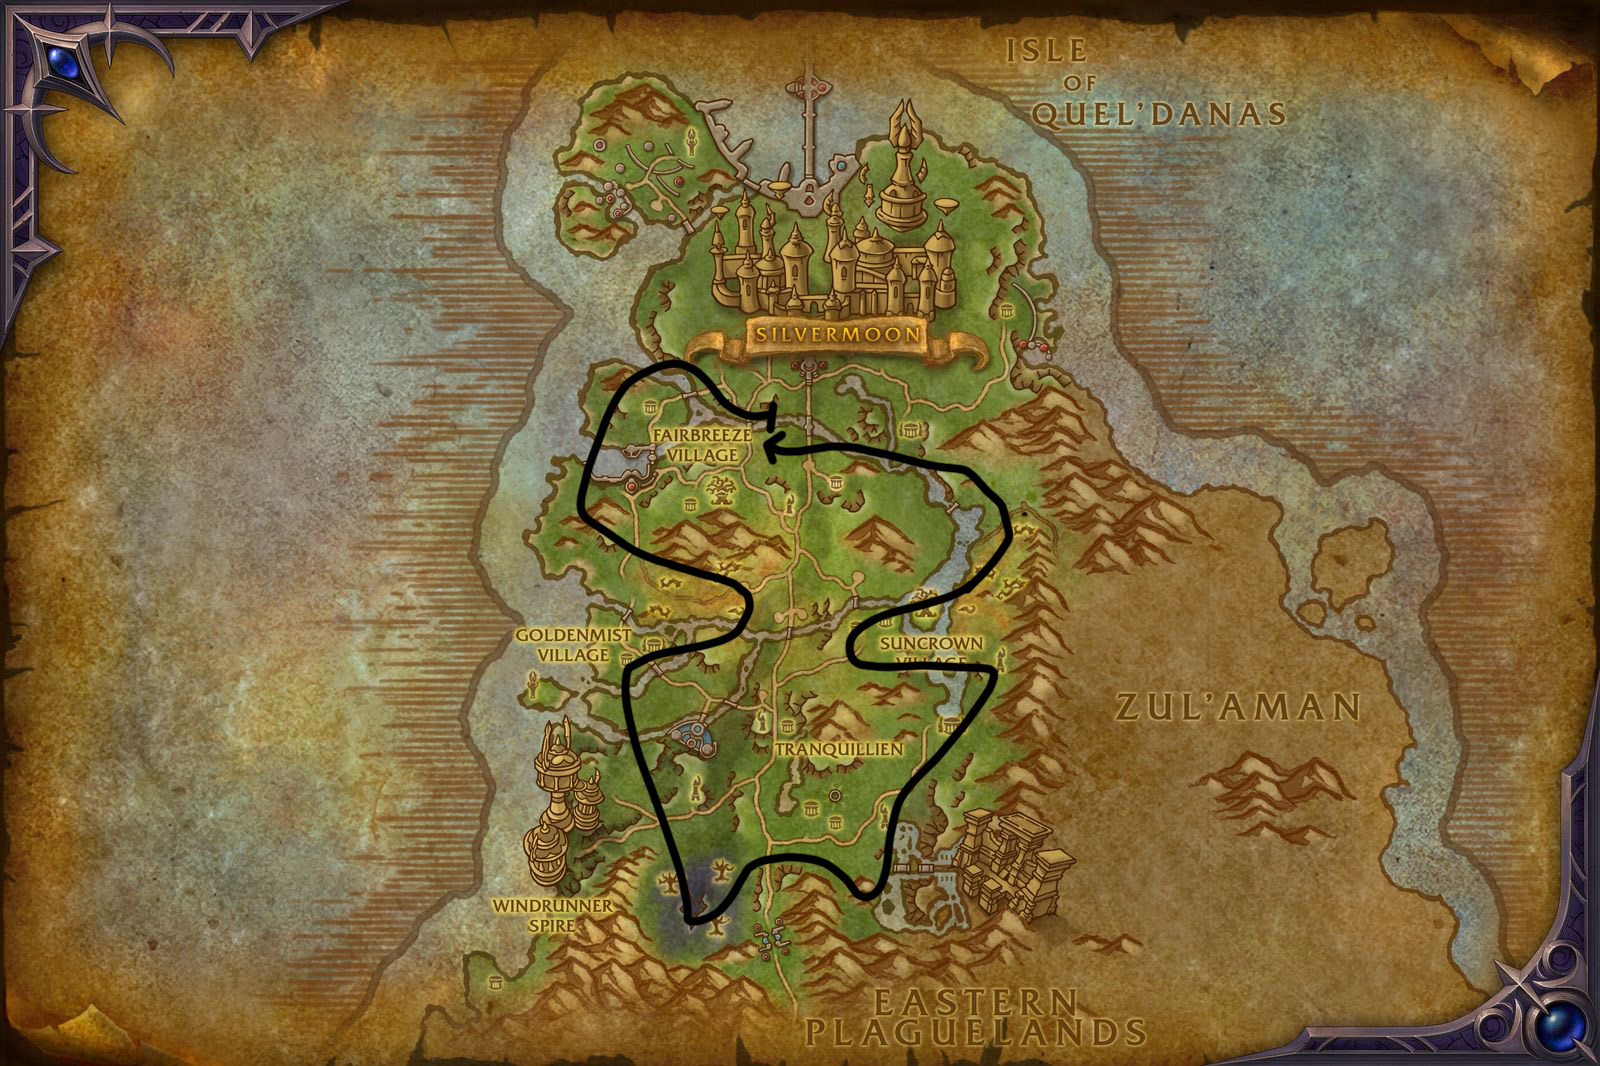
Mining in Zul'Aman is not recommended if you want to level your character with gathering only, or you will have to get some gear upgrades along the way. Infused Wild deposits summon mobs that can be tough to kill if you don't have good gear.
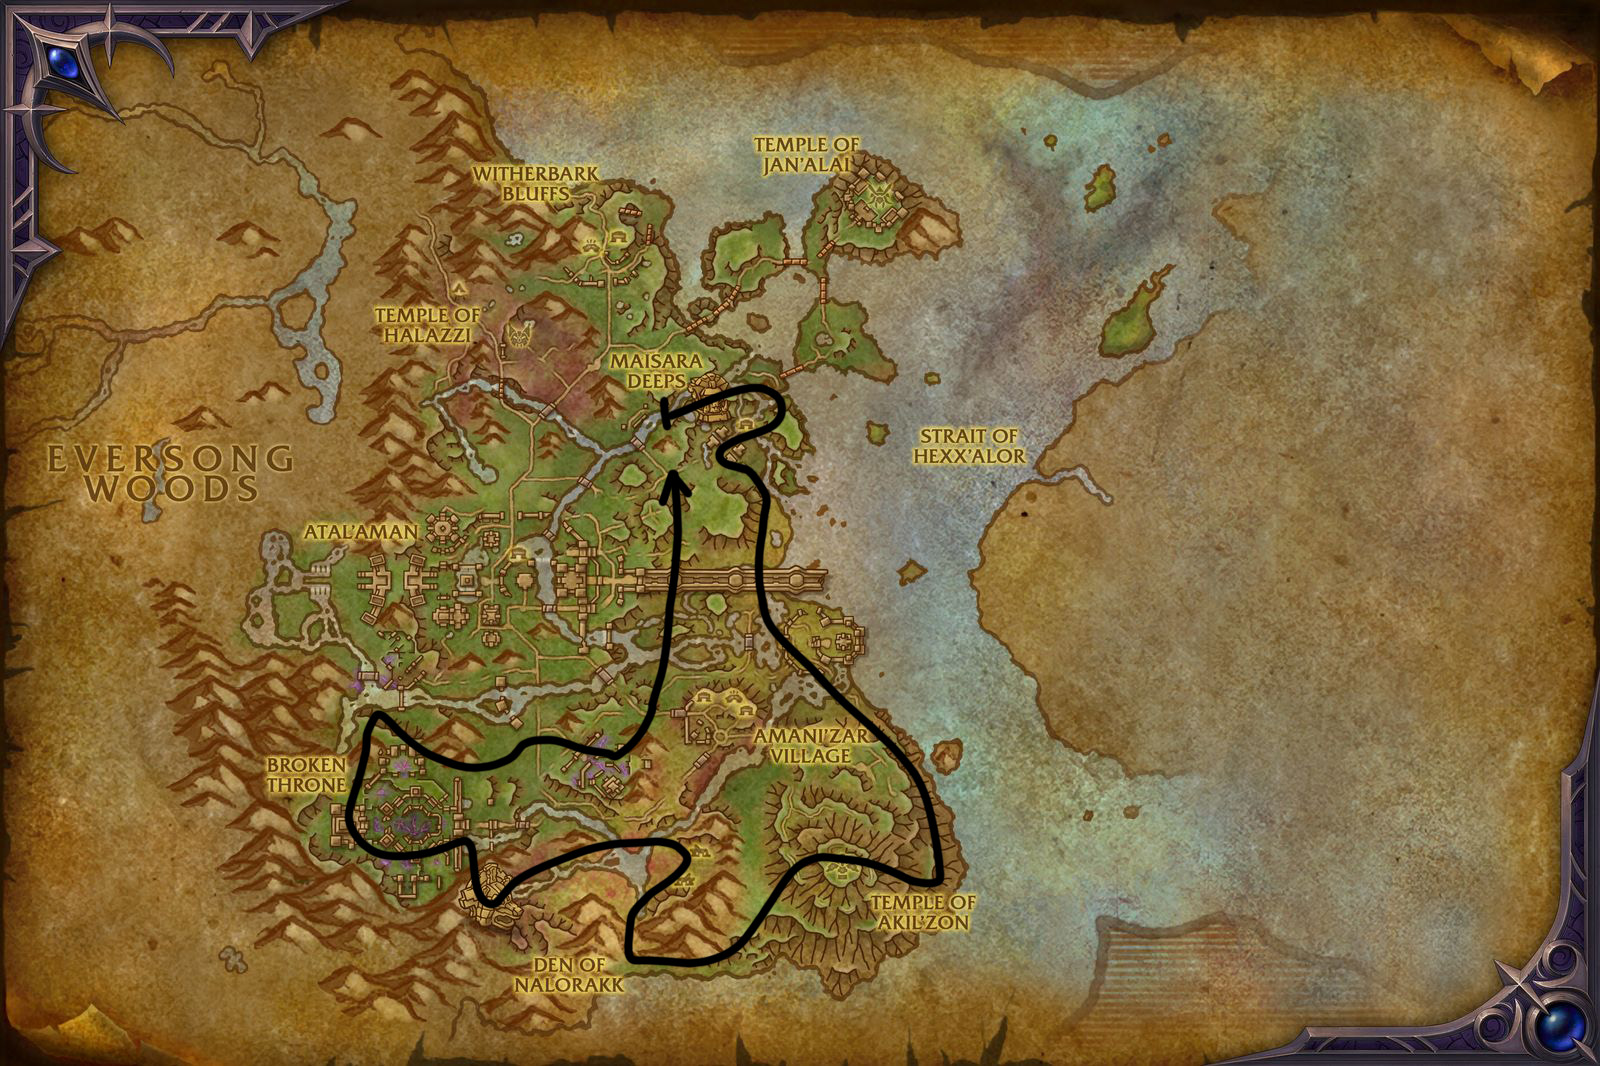
This is the route I use for farming for both herbalism and mining, so it's good for double gatherers. Maisara Deers have some elite mobs so sometimes you won't be able to kill the summoned infused mobs there. High deftness is recommended to avoid fighting mobs.
Overloading tip: I don't recommend using your Overload cooldown on Wild deposits here, as the spawned elite doesn't drop extra motes and the Perception buff is not that great. Save it for the occasional Voidbound deposits you find along the route instead.
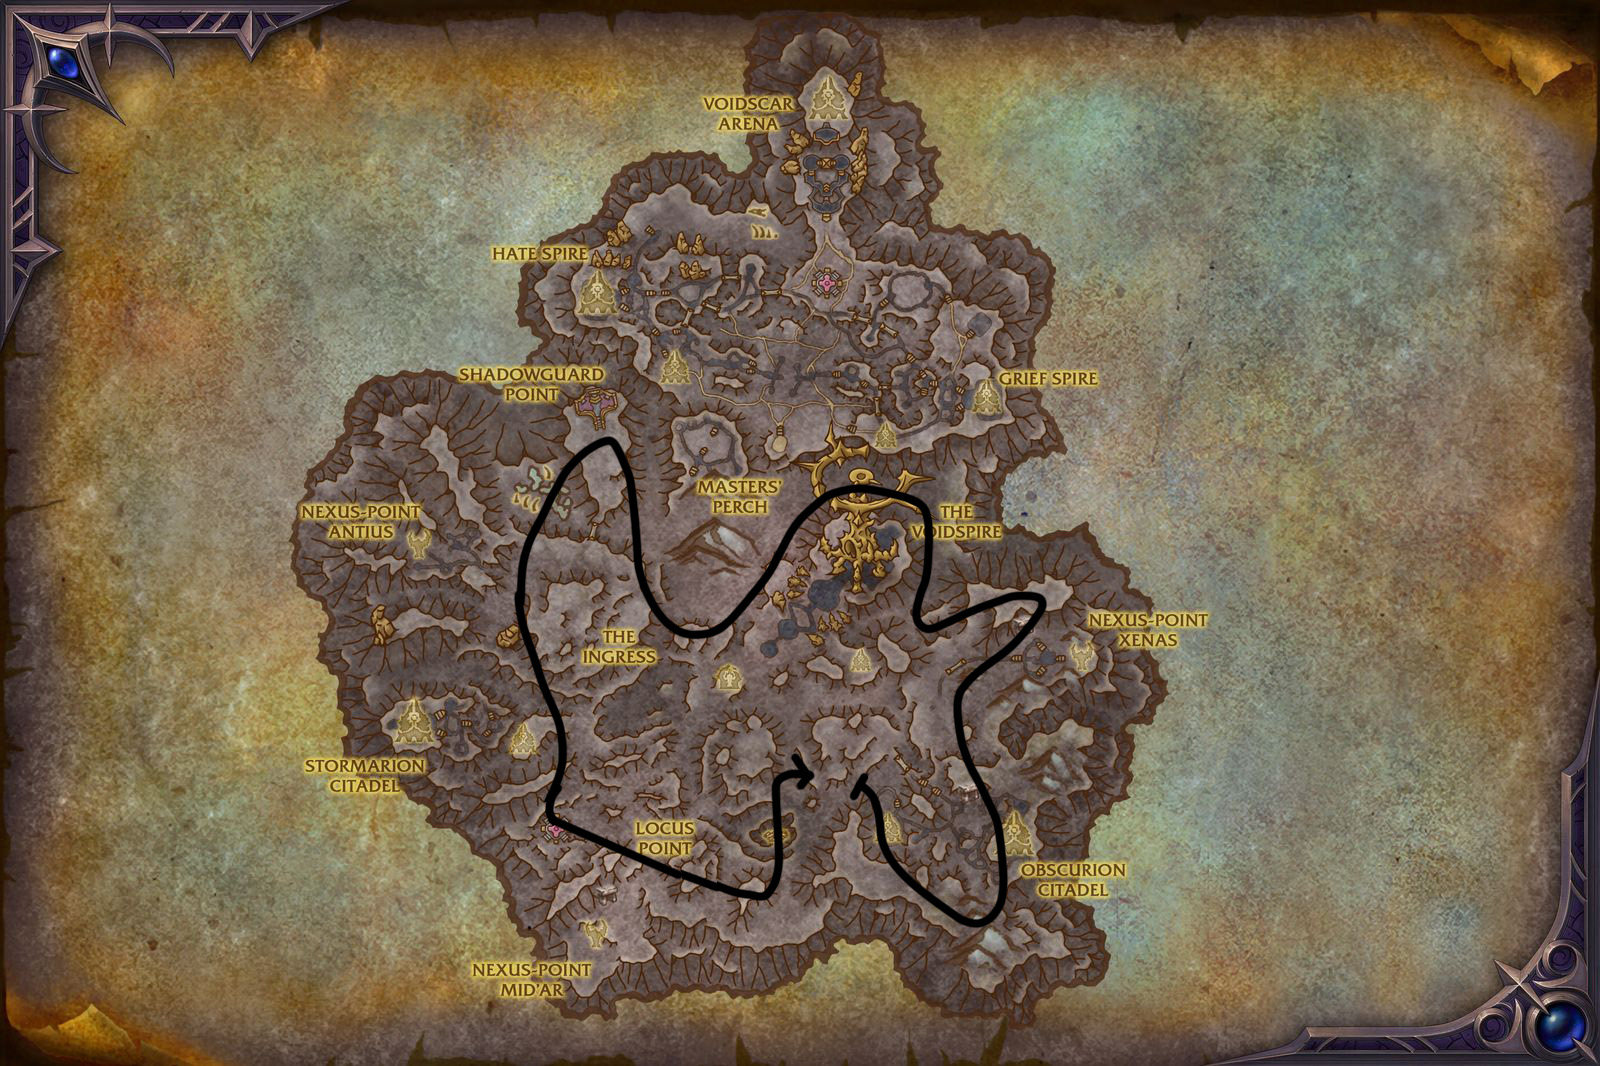
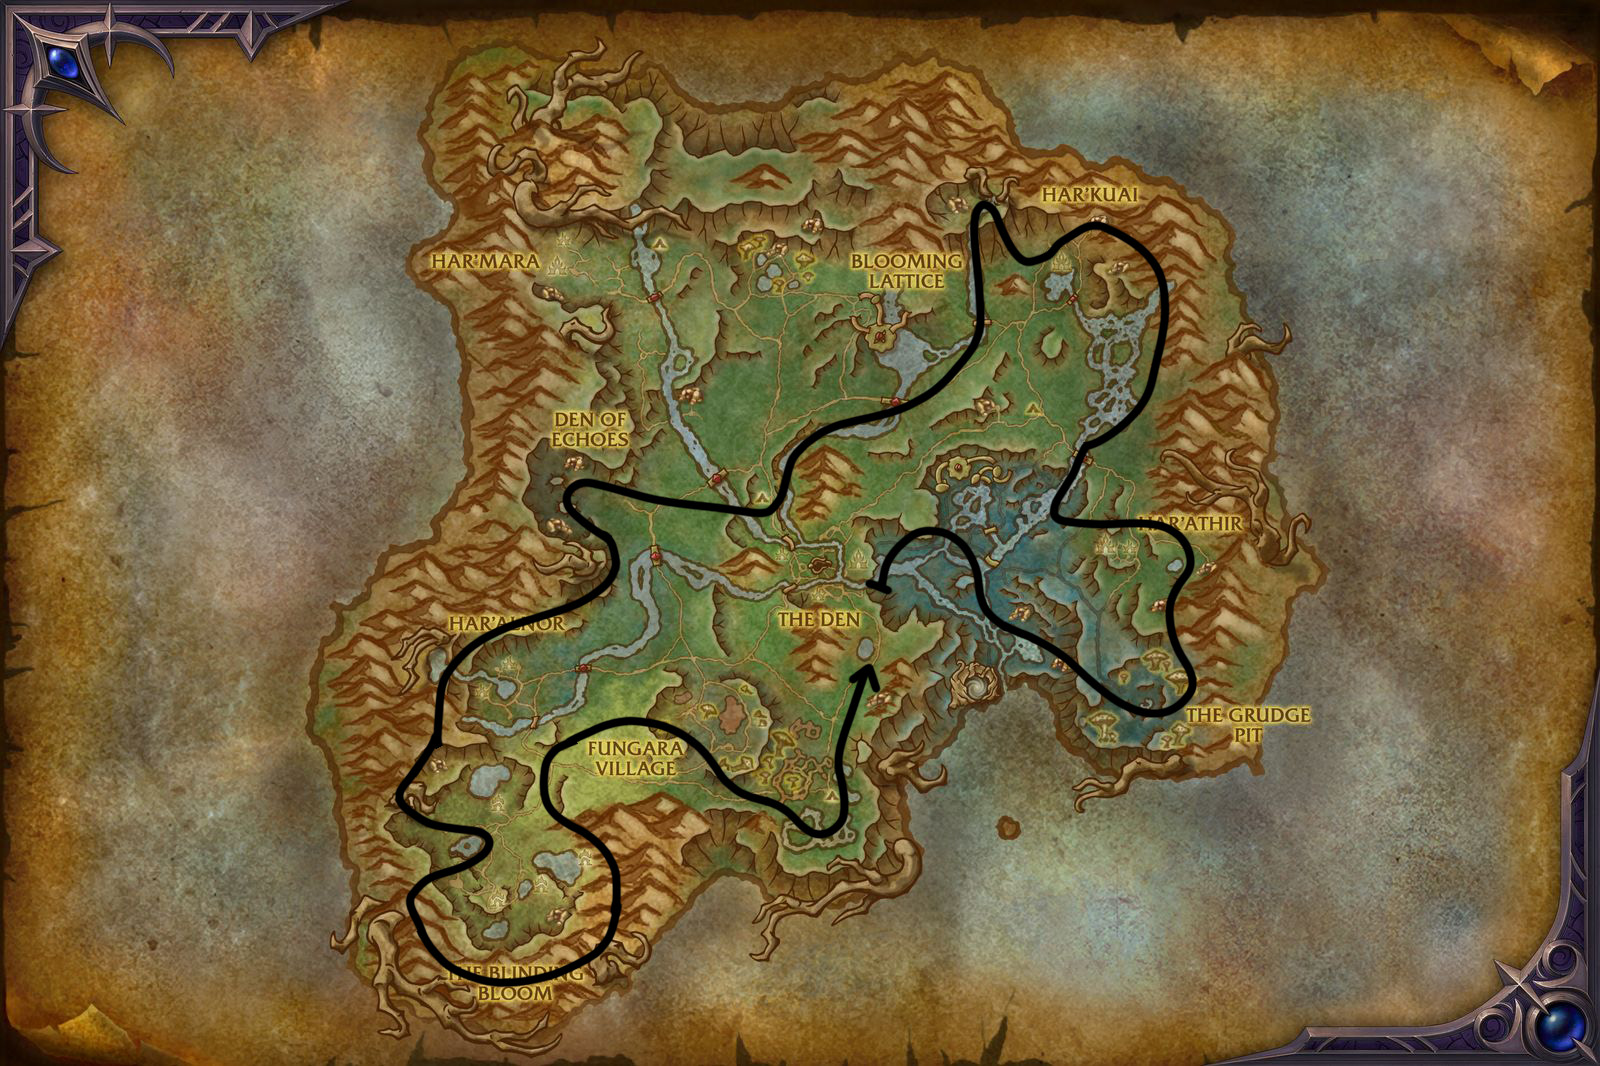
I try to make routes that avoid most mobs, but Harandar made that pretty hard, so these routes do have a lot of mobs in them. High deftness is recommended to avoid fighting.
There are a lot of vertical movements, so this route is not for everyone. If you find it annoying just stick to other zones, or skip the parts you don't like.
For Mining only, the route is fine since deposits are mostly on the ground. If you're also gathering herbs though, the zone gets much worse. Herbs are scattered on mushrooms and hidden in bushes on top of giant mushrooms everywhere. Harandar is probably the most annoying zone I've ever farmed in. If you're double gathering here, honestly you could just fly around randomly and still get a decent amount of both, but if you want something more structured, this is the route I used.
This zone probably has the highest mob density around nodes, so sometimes even with high deftness you have to try multiple times to mine a node. (just spam right click)
The zone is pretty rough to make a route for since the layout is all over the place. What I found works best is flying around the edge of the map and staying near the middle, since those areas seem to have much lower mob density. High deftness is recommended to avoid fighting mobs.
Don't follow these lines exactly, it's just basically the direction where you should be heading but then you can just zig-zag and fly around. But, also if you just go in a straight line around the edge of the map you will probably get a good amount of deposits too, since the nodes are pretty dense in this zone, so it's not really about following a specific route.